User manual for Neo 7 (R1) – Sony TV
User manual for the product Neo 7 Adapter together with a Beovision 7 stand (floor, wall or table) as well as a new Sony TV and a Beolab 7.
Introduction
Neo 7 Adapter has been developed to modernize the Beovision 7 system from Bang & Olufsen, where the TV is no longer up to date with today's streaming technology.
On the other hand, both the stand and the soundbar (Beolab 7) are contemporary and the design still holds up. The sound bar still represents something of the extreme in sound.
The system was introduced with the words "The world's best sound from a TV" - the goal with Neo 7 Adapter is bringing this slogan back to reality – just with a new and modern TV.
With a modern TV mounted on the stand, Beovision 7 is still an attractive offer for the modern home. The entire system is still operated with a Beo4 remote control or a Beoremote One remote control. Completely perfect.
Safety
In order to comply with safety and not cause any damage to physical products or people, the following must be respected.
- Check immediately that the packaging is not damaged and Neo 7 The adapter is not damaged. Do not use the product if it is damaged. Contact your supplier.
- Dispose of the packaging in accordance with the applicable regulations where you live.
- Use only the supplied AC/DC supply
- Use only approved cables
- Do not insert objects other than approved cables into plugs and holes
- Do not disassemble the product or modify the product.
- Do not subject the product to strong shocks or vibrations
- Stop using the product if you see smoke or experience a strange smell from the product
- Do not use organic solvents such as alcohol, benzine or paint thinner to clean the product.
- Do not wet the product with any means.
- Periodically remove dust from the product with a dry cloth.
- Do not wrap the product in fabric or adhesive so that the product cannot receive fresh air.
- Do not insert your fingers into open connectors or other openings in the product
- Small loose screws are included for mounting the product - make sure that children do not have access to the screws
Environmental considerations
If Neo 7 If the adapter is no longer functional or is no longer to be used, it must be disposed of properly. Hand it in for recycling in your municipality so that the product's parts can be recycled or destroyed properly.
Product description
products Neo 7 Adapter is developed for use with a Beovision 7 TV set from Bang & Olufsen.
The B&O TV is no longer up-to-date in relation to the current TV standard (MPEG-4), so Neo 7 The adapter makes it possible to attach a new Sony TV to the stand, whereby the entire product can be operated with a B&O remote control – a Beo4 or a Beoremote One.
Bang & Olufsen uses TV technology from the company LG in its own products, so the operation with a B&O remote control is experienced in much the same way, regardless of whether you are sitting in front of a system with Neo 7 Adapter connected or in front of a B&O TV. There may be slight differences.
The total product – a Beovision stand, a Sony TV and a Neo 7 Adapter - makes it possible to upgrade to a modern set that can last for many years to come.
The sound is transferred from the Sony TV digitally to the B&O soundbar (Beolab 7.x), so that the speaker is experienced in the best possible way. With a Beo4 or a Beoremote One, the entire system can be operated and experienced as a new TV from B&O. It is possible to turn and tilt the TV.
In other words, the previous investment in a Beovision 7 system can pay off, as the joy has been recreated with a Neo 7 Adapter kit.
Contents of the package
Before you start installing the product, check that the package contains a Neo 7 Adapter with a 12V power supply.
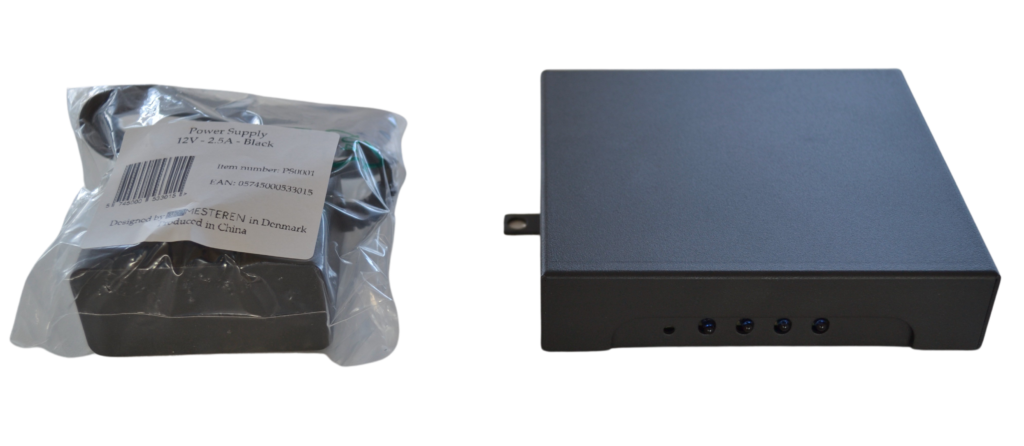
Not included
- Toslink cable between Neo 7 Adapter and TV
- Network cable for the Internet
- Power Link cable
These cables can be purchased at the Neo Mesteren webshop - Shop.neomesteren. Dk
Interconnection of the products Neo 7 Adapter and Sony TV
Before use must Neo 7 Adapter is mounted on the B&O stand together with the VESA plate and TV. You can read more at product website
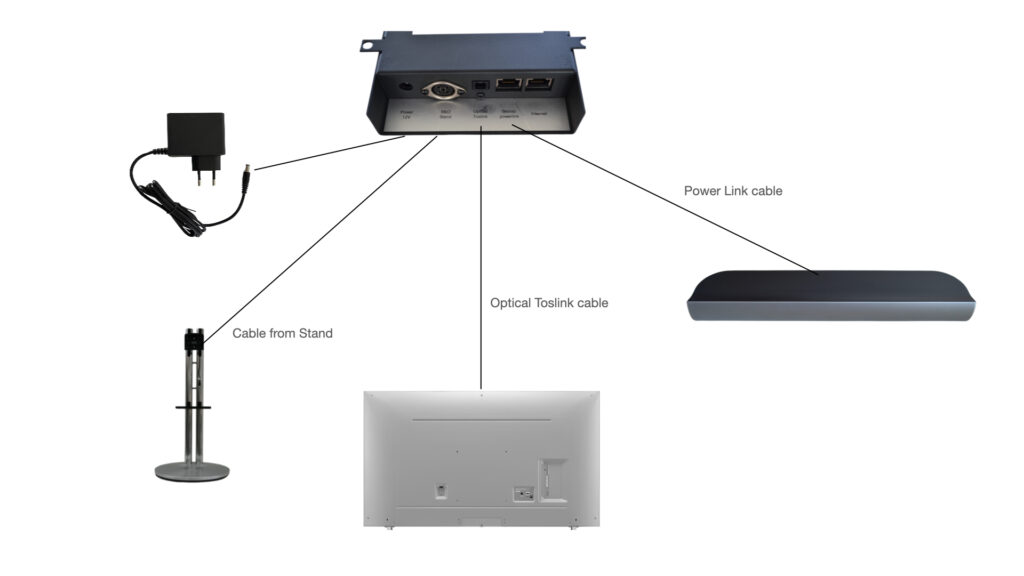
If you reuse Power Link cables from your previous setup, you must purchase a cable adapter between the 8-pin power link and the plug in Neo 7 Adapter. It can be purchased at NeoMesterens webshop – click here
If you don't already have a Powerlink cable, you can buy it here - it has a length of 0,5 metres. click here
Finally, you can buy an Optical Toslink cable if you don't already have one - click here
You can connect the product to the Internet via the Internet connector. Make sure the cable is directly connected to your Internet connection via a switch or directly into the Internet modem. With a connected cable to the Internet will Neo 7 Adapter could update the software to the latest new version.
Daily use af Neo 7 Adapter and Sony TV
The B&O remote control
The Beovision 7 system from Bang & Olufsen was typically delivered with a Beo4 remote control.
An updated Beovision 7 system with a new TV can be operated with several different B&O remote controls, but the best experience is achieved by using a Beo4 or a Beoremote One.
It is possible to use Beo4 in version MkI or MkII or MkIII or a Beo4 Navi. Operation is slightly different with these remotes than the Beoremote One.
Other B&O remote controls such as Beolink 1000, Beolink 5000, Beo5 and Beo6 can also be used, although with limited functionality.
It is recommended that the reader download manuals for B&O remote controls directly from the B&O website and read them thoroughly before use. In what follows, it is assumed that users understand the setup and daily use of B&O remote controls.
Before daily use, it is necessary to adapt the B&O remote control to the new setup with a new TV. Therefore, jump directly to the section on setup in this manual before daily operation.
Common functions
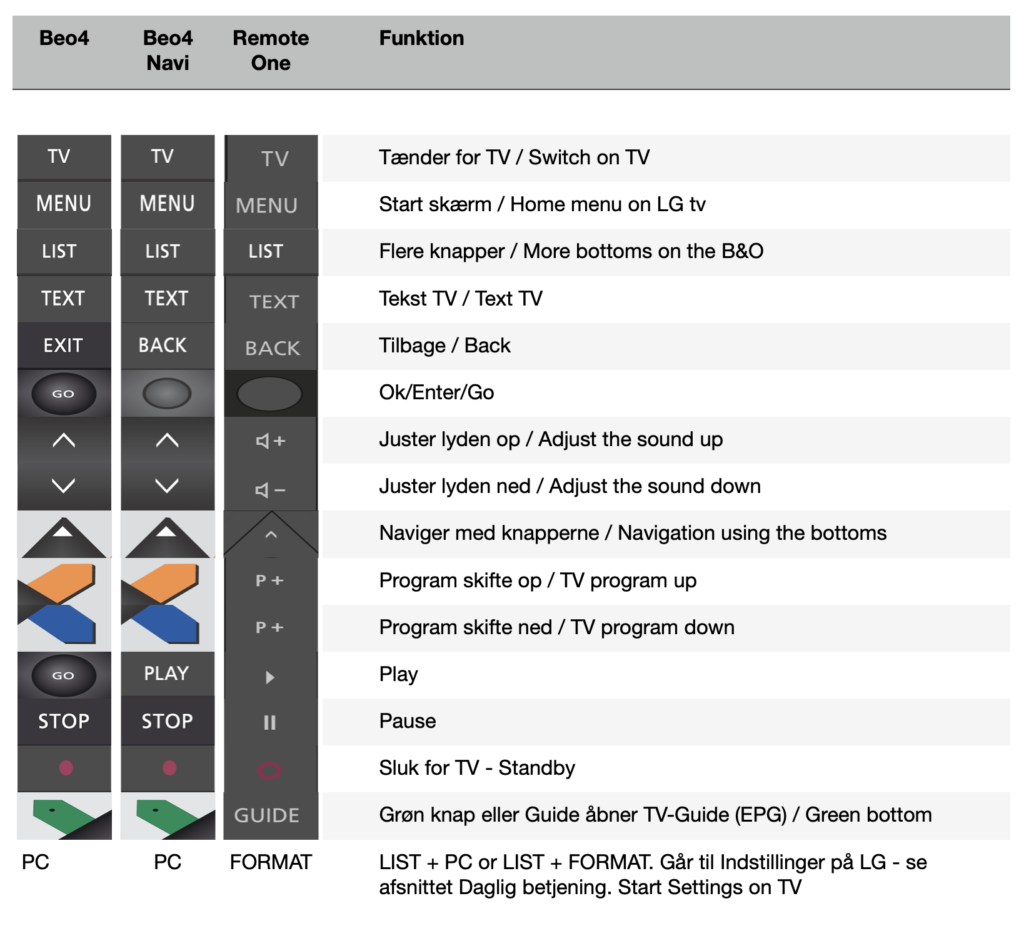
Switch on the Sony TV by pressing TV on the B&O remote control.
TV and stand will rotate/tilt to the exact position you have set as position 1 (see more later).
Turn off the TV on that button with the red circle.
The subsequent setups are based on a Beo4 remote control.
IR operation af Neo 7 Adapter
Beovision 7 TV is typically operated with a Beo4 remote control, where IR (Infra Red) is the control command between the remote control and Sony TV. It happens in the same way with Neo 7 Adapter.
IR is light, so it requires that Neo 7 The adapter sees this light either directly or via reflections from the wall, ceiling or furniture.
Since the Adapter is placed at the back of the TV for aesthetic reasons, it is important that the Adapter is not covered with cables or anything else, which thus makes it difficult for the IR commands to reach the Adapter. In particular, the 2 openings on the Adapter must not be covered, as the receiver diodes are located precisely here. Try to keep the area around the adapter as free as possible. Mount the cables in cable socks - it both looks nice, but also keeps the cables under control so that the IR reception is not disturbed. Cable stockings can be purchased at NeoMesteren website.
Overview of daily operation
| TV | Beo4 | Beo4 Navi | Remote One | Sony Remote |
|---|---|---|---|---|
| Turn on the TV | TV / Standby button | TV / Standby button | TV / Standby button | On/Standby button |
| Turn off the TV | Standby button | Standby button | Standby button | On/Standby button |
| Channel change on TV – up | Yellow button | Yellow button | P+ | Prog - up arrow |
| Channel change on TV – down | Blue button | Blue button | P- | Prog - down arrow |
| TV Guide (EPG) | Green button | Green button | Guide | Guide |
| Show Home Menu | Menu | Menu | Menu | Home |
| Input selector | DTV/SAT | DTV | MyBottom 1 | Input select |
| Quick Setup | Red button or LIST + Format | Red Button or Red Button | MyBottom 2 or MyBottom 2 | Quick Setup |
| Back in a menu | Stop | Stop | Back | Return/Back |
| Exit out of all menus | Exit | Back | Exit | Exit |
| Mute the sound | Volume up/down | Volume up/down | Volume up/down | Mute |
Setting up the product Neo 7 Adapter with Sony TV
Do not connect the included power supply until all other cables have been installed.
Fasten Neo 7 The adapter on the VESA plate before use
Before use, it must be ensured that all installed cables are not damaged or have visible external damage.
The product must be set up before use. The following setup of the product must be performed
- Preparation of the B&O remote control
- Neo 7 The adapter must be adapted to the installed TV make
- The TV stand must be set up before use
- The TV must be prepared so that the sound comes out of the digital output, which ensures that the sound is transferred in the best way to the Beolab 7 speaker
- Setting up the sound level on the Beolab 7 speaker
Preparation of the B&O remote control
You must adapt your B&O remote control to the new setup with a Sony TV. It is recommended to read the manual on the B&O remote control used - which can be downloaded directly from Bang & Olufsen's website.
You must adapt the remote control to the necessary buttons in the LIST menu.
The following buttons must be added to the LIST menu
- STAND button – this is used to rotate the stand and tilt the TV on the floor stand, table stand or wall holder.
- FORMAT button – this is used to bring up Settings on the TV
The method for adding buttons in the LIST menu appears in the manual on the Bang & Olufsen website.
Setting up the Sony TV for correct sound output
Neo 7 The adapter receives the sound from the TV digitally via an optical fiber cable, also called Optical Toslink.
The sound is sent directly through Neo 7 The adapter for the Beolab speaker via the Power Link cable.
There is volume regulation of the sound - which is controlled from the B&O remote control - but otherwise the sound is not processed.
The TV must be set up to send the sound out of the optical toslink output.
Often the TV has the option to send the sound both to Toslink and the TV's own speaker or only to Toslink. The Beomesteren recommends only the Toslink output, so the sound can only be regulated via the B&O remote control.
Consult the TV's own manual to do this setup.
Typically this happens by choosing
- Settings on TV, hereafter
- sound and finally
- Audio output
Choose Optical.
Choose PCM
Note - very important: Digital audio output must be set to PCM - otherwise the sound will not work Neo 7 Adapter.
Note - Neo 7 Adapter turns on when TV turns on and turns off when TV turns off. This is controlled by the optical cable. It is therefore important that the optical signal is present. Check it by looking at the end of the cable - if there is a red light, then the optical signal is present and it is set up correctly.
Choice of TV brand
Neo 7 Adapter is developed to fit several TV brands. The following brands can be used
| Number | Make | Remark |
|---|---|---|
| 101 | LG | In operation |
| 102 | Samsung | In operation |
| 103 | Philips | In operation |
| 104 | Sony | In operation |
| 105 | Loewe (We See, Bild C and Bild I) | In operation |
| 106 | Panasonic | In operation |
| 107 | Sharp | Planned |
| 108 | Hisense | Planned |
| 109 | Loewe (Image 1,2,3,V,S) | In operation |
If you want to change the TV make, do the following
(NOTE, this can only be done when the TV is off/standby. If you are not sure if the TV is in standby, remove the power from the Sony TV before setting up)
MENU is the menu button on the remote control)
MENU 1 XXX GO
You must replace the 3 pieces XXX with the number in the table. For example, if you want to set up for Sony TV with number 104, you must do the following
MENU 1 104 GO
When the setup is done, the setup is saved automatically. If the setup went well, two short beeps will be heard. If you hear a long BEEP, the setup did not go well and you need to redo it.
Setting up the stand
Before daily use, the Sony TV stand must be set up.
The setup is done automatically with Neo 7 Adapter installed. The setup will automatically rotate with the stand and tilt with the TV to find the outer positions.
(NOTE, this can only be done when the TV is off/standby. If you are not sure if the TV is in standby, remove the power from the TV before setting up)
Especially around the tilt/tilt function on the stand
B&O developed the Beovision 7 stand especially for a Beovision 7 TV. These types of B&O TV are made so that the balance point in the height of the device is in the middle, which means that the tilt/tilt function on the stand is in balance. When you tilt a B&O TV, it will remain in balance after a tilt change.
If a Sony TV is placed on the stand, it is necessary to choose a TV that is balanced around the middle, otherwise the tilting function will not work properly. If, for example, a TV is chosen where the screen is thin and all the electronics with plugs are at the bottom, the height center of gravity will not be in the middle. This means that the TV is heaviest at the bottom and the tilting function on the stand cannot keep the TV vertical - it is simply gravity that causes the TV to tilt back. For that reason, the tilt function will not work correctly.
The Beovision 7 stand
Setting up the stand can be done in two ways
- Setting up the stand only in the turning function (left/right)
- Setting up the stand both in the swivel function (left/right) and in the tilt function (up/down)
If a TV is mounted on the stand that is not in balance (see the section opposite), then the tilt/tilt function cannot be used, and a setup with only the rotate function must therefore be selected.
If a setup is attempted in both directions – and your TV is not balanced – you will get an error. The error can result in a problem with all turning as well - in that case, the setup must be performed again, but only for the turning function.
The setup only needs to be done the first time the product is set up. However, it must be performed again if Neo 7 Adapter is replaced or if you have used the reset button on Neo 7 The adapter.
The setup must also be carried out again if the stand is replaced.
Warning – in connection with the set-up, no one must touch the TV or the stand for safety reasons. Children and animals must be kept far away during the set-up. The stand and TV rotate and tilt, so be careful.
You must not remove the power from the TV or the stand in connection with the set-up. If this happens, you must perform a new setup. Do not press the remote control when the process is performed.
The setup process takes about a minute.
The setup is performed as described below.
(NOTE, this can only be done when the TV is off/standby. MENU is the menu button on the remote control)
Setup for the rotate function for Beovision 7.40 stand (left/right)
MENU 4 0 9 1 GO
The setup for the swivel function for Beovision 7.40 stand (left/right) and the tilt/tilt function (up/down)
MENU 4 0 9 2 GO
Setup for the rotate function for Beovision 7.32 stand (left/right)
MENU 4 0 9 3 GO
When the setup is done, the setup is saved automatically. If the setup went well, two short beeps will be heard. If you hear a long BEEP, the setup did not go well and you need to redo it.
Setting the 4 stand positions
| Position | Location |
|---|---|
| 0 | Standby position – TV is switched off – when the TV is switched off, the stand goes to position 0 |
| 1 | When the TV is switched on from stand-by, the stand goes to position 1 |
| 2 | The user must select position 2 via the remote control |
| 3 | The user must select position 3 via the remote control |
You can set the positions as follows
(STAND is obtained by pressing LIST STAND GO)
| Position | Remote control command | Comment |
|---|---|---|
| Standby position – 0 | STAND | Activates the stand |
| LEFT ARROW - RIGHT ARROW - UP ARROW - DOWN ARROW | Sets the stand position and tilt position that the TV will be in when standby (off) is pressed | |
| STAND - GREEN BUTTON - 0 | Saves the position with number 0 | |
| Switch on position – 1 | STAND | Activates the stand |
| LEFT ARROW - RIGHT ARROW - UP ARROW - DOWN ARROW | Sets the stand position and tilt position that the TV will be in when the TV is switched on via the TV button | |
| STAND - GREEN BUTTON - 1 | Saves the position with number 1 | |
| Own position – 2 | STAND | Activates the stand |
| LEFT ARROW - RIGHT ARROW - UP ARROW - DOWN ARROW | Sets the position of the stand and tilting position, as the user's own position 2 | |
| STAND - GREEN BUTTON - 2 | Saves the position with number 2 | |
| Own position – 3 | STAND | Activates the stand |
| LEFT ARROW - RIGHT ARROW - UP ARROW - DOWN ARROW | Sets the position of the stand and tilting position, as the user's own position 3 | |
| STAND - GREEN BUTTON - 3 | Saves the position with number 3 |
If Neo 7 Adapter has received your command correctly, you will hear 2 beeps – if an error has occurred, you will hear a long beep.
The desired positions can be selected/activated by pressing
STAND X
Where X is replaced with the desired position – for example, if the user wants to set the stand in position 2, then press
STAND 2
Factory settings on Neo 7 Adapter is a center location for both position 0, 1, 2 and 3 (applies to both tilt position and swivel position). You must therefore set the desired positions yourself if you choose it other than the middle.
Setting restrictions on the turn and tilt function
In certain cases, it may be necessary to limit the turning and tilting function. It could be, for example, that there is a piece of furniture that the TV will turn towards. This restriction can be done in the following way
| Restriction | Remote control command | Comment |
|---|---|---|
| Right side | STAND | Activates the stand |
| RIGHT ARROW | Sets the position of the stand on the right side - position the TV exactly where the restriction should be | |
| STAND - GREEN BUTTON - 4 | Saves the boundary for the right side | |
| Left side | STAND | Activates the stand |
| LEFT ARROW | Sets the position of the stand on the left side - position the TV exactly where the restriction should be | |
| STAND - GREEN BUTTON - 5 | Saves the bounds for the left side | |
| Down/bottom | STAND | Activates the stand |
| ARROW DOWN | Sets the position of the stand at the bottom - position the TV exactly where the restriction should be | |
| STAND - GREEN BUTTON - 6 | Saves the border at the bottom | |
| Up/the top | STAND | Activates the stand |
| ARROW UP | Sets the position of the stand at the top - position the TV exactly where the restriction should be | |
| STAND - GREEN BUTTON - 7 | Saves the boundary at the top |
If you regret a restriction, you can delete it by doing the following.
STAND – RED BUTTON – 4
This will delete the restriction on the right side.
You can do the same for the Left side (5), the Bottom (6) or the Top (7).
Setting up the sound level on the Beolab 7 speaker
The sound from the Beolab 7 speaker can be adjusted with the B&O remote control. On a Beovision 7 TV you can see the sound level on the screen, but this is not possible in this solution with a new TV.
The sound can be set up in two areas. A desired start-up sound and a maximum sound level can be set.
Startup sound
The startup sound can be adjusted between 0% (the sound is completely gone) to 100% (the sound is at maximum level). From the factory, the starting level is limited to 20%. This can be changed between 0% and 100%.
Warning - do not set the start volume higher than 50%. It can cause hearing damage to people in the room.
You don't have to worry if the starting sound of 20% is satisfactory.
If you want to change the start sound, you can do the following via the LIST buttons.
(NOTE, this can only be done when the TV is off/standby. MENU is the menu button on the remote control).
Marking:
MENU 3 XXX GO
You must then replace the three XXX with your desired start sound level. You write eg 000 for 0% or 010 for 10% or 030 for 30% sound level.
If you want to set 30% start sound level, press the following
MENU 3 030 GO
If the setup went well, you will hear 2 short BEEP sounds. If the setup did not go well, you will hear a long BEEP sound. Try again until you get 2 short BEEP sounds.
Note that the start-up sound cannot be set higher than the maximum sound level. From the factory, the maximum sound level is set to 100%, but can be set lower (see next section).
Maximum sound
MENU 2 XXX GO
Technical help
If a technical problem occurs with Neo 7 Adapter, you must remedy the error before contacting the place of purchase.
You can also read more at NeoMesteren Homepage - www.neomesteren. Dk
If the product is in a state where the product no longer responds to the remote control, you can try the following
- Disconnect the power to the product by unplugging the power supply from the outlet or disconnecting the 12 V cord from the product. Wait 5 seconds and reconnect the power. If this does not help, go to point 2
- You can reset the product - back to its original setting. This is done by subsequently pressing the remote control. TV must be switched off.
Note that you must then set up the product again - see above in the manual.
- MENU 9 9 9 9 GO.
This will reset all settings on the product but retain the setup of the stand. - MENU 9 9 9 8 GO.
It will reset all settings including resetting the stand setup.
- MENU 9 9 9 9 GO.
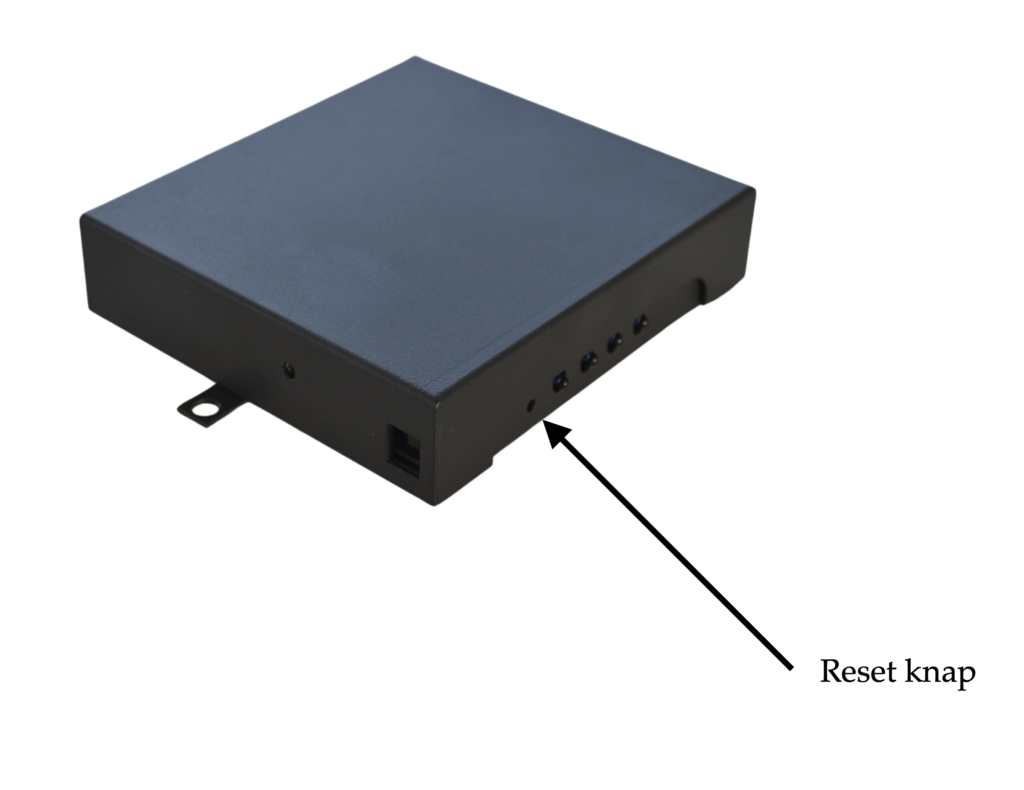
- Remove the 12 V cable Neo 7 The adapter. Wait 10 seconds.
Press and hold the Reset button on the product.
(Use the end of a paper clip or similar. Press carefully so you don't damage the small push button inside the product)
Now connect the power simultaneous by holding down the Reset button.
This will reset everything on the product and you will have to perform the setup again.
You will subsequently hear 4 short beeps as a response that it went well.
Updating the software on Neo 7 Adapter
Do you need to update the software on Neo 7 Adapter, so read here how